
We have been using Sitecore CDP for a while now and it works well for personalization and audience segmentation. But whenever it comes to reporting, it starts to show its limits. Things like revenue by campaign, revenue from organic vs campaign traffic, revenue for a specific test variant, or just getting detailed report of website traffic are not available out of the box in CDP dashboards.
We reached out to Sitecore support and they suggested that it might be worth exploring Raw CDP data. Once we get the raw data out, we can run our own reports either through AI or something like BigQuery where we have full control over the queries.
The first step in that direction was figuring out how to actually get the data out of Sitecore. In this post I will walk you through the steps how we actually got there, some misconceptions and issues faced step by step.
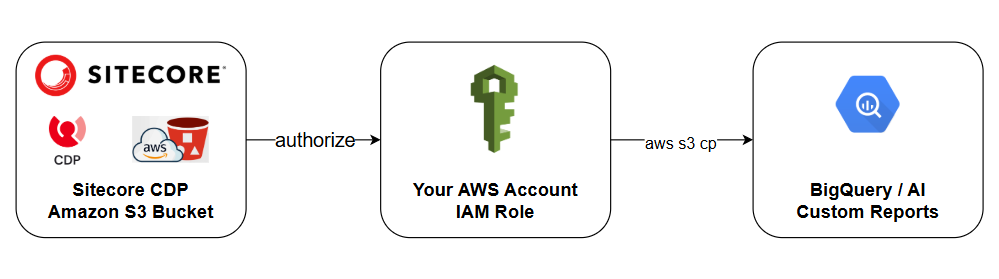
How It Actually Works
Before I get into the steps and this is important to understand before you start Sitecore already has a S3 bucket. You do not need to create your own unless you want to store the exported data in it. I was initially under the impression that Sitecore would push the data into our S3 bucket automatically and hence we will need our own S3 bucket which is obviously not true.
The Sitecore bucket is named following this pattern:
s3://bx-<client_key>-<env>-<region_code>/What you do is create an IAM role in your own AWS account, attach a specific policy to it, and then ask Sitecore via a support ticket to authorize that exact role ARN to read from their bucket. Sitecore locks down access at their end to only that specific role ARN nothing else can read from it.
This also explains why having an admin role through OKTA is not enough, which I’ll get into later.
The Overview
- Create an IAM role in your AWS account
- Attach an inline policy to the role granting access to the Sitecore bucket
- Raise a support case with Sitecore providing your role ARN
- Sitecore will grant you the access and confirm
- Install and configure AWS CLI on Windows (with or without OKTA)
- Use the IAM role to download or copy your data
Step 1: Create an IAM Role
In the AWS Management Console, go to IAM → Roles → Create role.
Create a role that will be authorized to access your organisation’s data in the Sitecore S3 bucket. Make a note of the role ARN once it is created you will need it for the support ticket. It will look like this:
arn:aws:iam::<aws_account_id>:role/<role_name>For example,
arn:aws:iam::012345678901:role/sitecore-access-s3-roleYou can name the role whatever makes sense for your organisation, but something descriptive like sitecore-cdp-s3-role is a good practice.
Important: This role grants exclusive read access only to the user who created it. When requesting access, you must provide the specific ARN of this role. Do not change the role after Sitecore has authorised it any modification will break access because Sitecore’s bucket is locked to that exact ARN.
Step 2: Attach an Inline Policy to the Role
After creating the role, attach the following inline policy to it.
Open the role → Add Permissions → Create inline Policy → Switch to JSON → Next and Save
This gives the role permission to read and list objects in your organisation’s Sitecore bucket.
json with an example below
{
  "Version": "2012-10-17",
  "Statement": [
    {
      "Sid": "AllowS3Access",
      "Effect": "Allow",
      "Action": [
        "s3:GetObject",
        "s3:ListBucket"
      ],
      "Resource": [
        "arn:aws:s3:::bx-<client_key>-production-<region_code>/*",
        "arn:aws:s3:::bx-<client_key>-production-<region_code>"
      ]
    }
  ]
}

Example

{
  "Version": "2012-10-17",
  "Statement": [
    {
      "Sid": "AllowReadFromSitecoreCDPBucket",
      "Effect": "Allow",
      "Action": [
	"s3:GetObject",
	"s3:ListBucket"
      ],
      "Resource": [
         "arn:aws:s3:::bx-abcxyzertyyysswew-production-us-east-1",
         "arn:aws:s3:::bx-abcxyzertyyysswew-production-us-east-1/*"
      ]
     }
    ]
}
Replace the placeholders with your values:
| Placeholder | Where to find it |
|---|---|
<client_key> | Sitecore CDP → API access → Client key |
<region_code> | Sitecore CDP → Company information → Environment. One of: us-east-1, eu-west-1, ap-southeast-2, ap-northeast-1 |
Step 3: Request Access from Sitecore
Create a support case with Sitecore and provide your IAM role ARN. Sitecore documentation says that “Sitecore will organise a call with you to confirm the role ARN, your AWS account ID, and other account details” however in our case there was no call and Sitecore notified via support ticket once the access was granted.
Once enabled, Sitecore runs a daily full export of your organisation’s data to:
s3://bx-<client_key>-<env>-<region_code>/analytics/bdl/exports/data/Sitecore keeps the last three days of exports in that folder for redundancy. Inside, the data is split into subfolders:
- events – date-partitioned (
meta_created_at_date=YYYY-MM-DD). Additive, so you only need to pull the latest day’s partition to stay up to date. - sessions – also date-partitioned. Same approach as events.
- guests – partitioned by type:
CUSTOMER,VISITOR,RETIRED. This dataset changes constantly so pull the full folder each day.
Step 4: Install AWS CLI on Windows
Download and install the AWS CLI v2 MSI installer:
https://awscli.amazonaws.com/AWSCLIV2.msiAfter installation, open a new Command Prompt or PowerShell window and verify:
aws --versionStep 5: Configure AWS CLI to Use the IAM Role
How you configure the CLI depends on your organisation’s AWS setup.
Option A: With OKTA (AWS IAM Identity Center / SSO)
Run:
aws configure ssoSSO session name: sitecore-cdp
SSO start URL: https://your-company.awsapps.com/start
SSO region: us-east-1
SSO registration scopes: sso:account:accessIt opens a browser window to complete the OKTA login, then lists the AWS accounts and roles you have access to. Select the account and the IAM role you created in Step 1, give the profile a name (e.g. cdp-s3).
To log in:
aws sso login --profile cdp-s3Option B: Without OKTA (Plain IAM User)
If your setup uses a plain IAM user with access keys, run:
aws configure --profile cdp-s3Enter the Access Key ID and Secret Access Key for the user. Make sure that user has permission to assume the IAM role you created.
Step 6: Access Your Data
Once the CLI is configured, verify your assumed identity first:
aws sts get-caller-identity --profile cdp-s3The ARN should show the role you created in Step 1 – something like:
json
{
    "Arn": "arn:aws:sts::012345678901:assumed-role/sitecore-access-s3-role/s3-session"
}
Then use aws s3 cp commands to download your data:
Download the last three days of exports to your local machine:
aws s3 cp s3://bx-<client_key>-production-<region_code>/analytics/bdl/exports/data . --recursive --profile cdp-s3Download a specific date’s export:
aws s3 cp s3://bx-<client_key>-production-<region_code>/analytics/bdl/exports/data/2025-01-27 . --recursive --profile cdp-s3Copy to another S3 bucket:
bash
aws s3 cp s3://bx-<client_key>-production-<region_code>/analytics/bdl/exports/data s3://your-sitecore-cdp-export-<id>/cdp/ --recursive --profile cdp-s3The Problem: Admin Role in OKTA but Still Access Denied
This is what caught me. I was logged in via OKTA, had an admin role in the AWS SSO app, ran the aws s3 ls command, and got:
An error occurred (AccessDenied) when calling the ListObjectsV2 operation: Access DeniedRunning aws sts get-caller-identity showed:
{
    "Arn": "arn:aws:sts::111122223333:assumed-role/admin-role/my-name@company.com"
}
That is the problem. The role I was assuming was admin-role but Sitecore’s bucket is locked to recognize only the specific role ARN you provided during the support ticket process. An admin role, or any other role, simply does not exist in their bucket’s access list.
Fix for OKTA users
You need to be assuming the correct role the one you created in Step 1 and provided to Sitecore. There are two ways to get there:
Option 1: If your OKTA / AWS SSO setup exposes that role as one of your assignable roles, select it when running aws configure sso or switch to it in your profile.
Option 2: Assume the role manually using your current session:
aws sts assume-role \
  --role-arn "arn:aws:iam::YOUR_ACCOUNT_ID:role/sitecore-access-s3-role" \
  --role-session-name "s3-session" \
  --profile cdp-s3
This returns temporary credentials. Export them as environment variables or create a new named profile from them. Then your caller identity will correctly show assumed-role/sitecore-access-s3-role/s3-session and Sitecore’s bucket will allow access.
If you get an error saying the role does not exist or you are not authorized to assume it, you either have not completed Step 1 yet, or the role name does not match what you provided to Sitecore.
Fix for plain IAM users
Same root cause only the specific IAM role ARN is authorized. An IAM user cannot access the bucket directly. The user must have sts:AssumeRole permission to assume the role, then use the role’s credentials for the S3 commands.
Size of the data
One of the things I wanted to know before starting was the size of data and Sitecore gave no clue till I actually downloaded the data. The average size in our case is 25GB for a mid-sized website
Happy Sitecoring 😊