
On standard Sitecore installation, installing the Smartling Connector is pretty straight forward, open the Installation Wizard, upload three packages, add a connection string, recycle the app pool and you are done.
In a containerized Sitecore XM/XP setup, whether that’s your own Azure Kubernetes Service (AKS) cluster or Sitecore Managed Cloud Containers, that approach does not work. Containers are immutable, anything you install through the wizard lives in a writable layer that disappears the next time the pod restarts or a new image rolls out. The module has to be baked into the image itself.
We recently went through this exercise with the Smartling Sitecore XP Connector (v1.18.x, three packages: the core connector, the Remote module and the Link Field Translator). It took a couple of pull requests and some surprises to get it right. This post walks you through the method we used and the issues we faced, so you can skip the crash loops we didn’t.
Asset-only module image
The idea is simple, treat the Smartling module like any other Sitecore module asset (SXA, SPE, Horizon) and ship it as its own image that the CM build copies from.
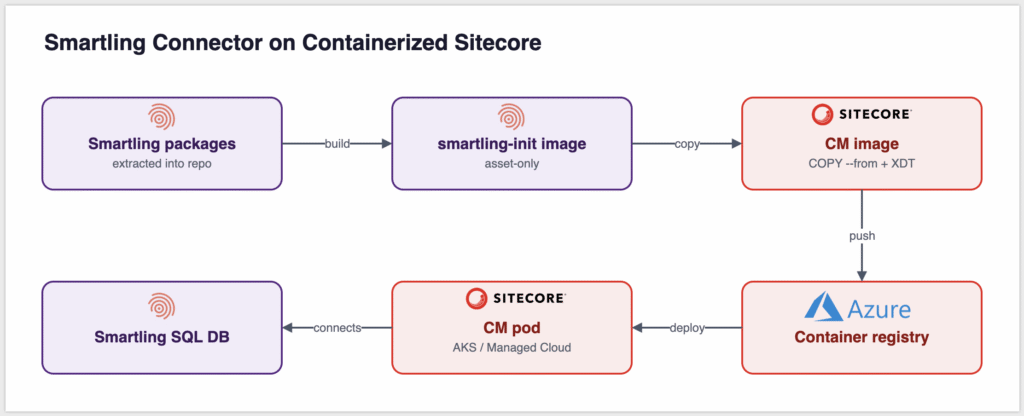
Why a separate image instead of just dropping the files into the CM build context?
- Separation. The vendor’s ~100 files (DLLs, configs,
sitecore modules/ShellUI) live in one folder with one owner. The CM Dockerfile only knows “copy from smartling”. - Reuse. If you run both a standard CM and an experience edge-flavored CM, both can pull from the same asset image.
- Upgrades. Bumping to the next connector version is a change to one folder, not a hunt through the CM build.
The asset image is never deployed as a service. It exists only as a build-time source for COPY --from.
Step by step
1. Extract the packages into a module folder
Download the three connector packages for your Sitecore version. Each is a Sitecore package zip with a nested package.zip inside. Extract the files/ portion of each and merge them into one tree
docker/build/smartling/
  Dockerfile
  module/cm/content/
    App_Config/Include/Foundation/Smartling/
      Smartling.Connector.config
      Smartling.Connector.Remote.config
      Smartling.Connector.LinkFieldTranslator.config
    App_Config/Include/zzz/
      Smartling.Connector.Logging.config
    bin/
      Smartling.Connector.dll
      Smartling.Connector.Remote.dll
      Smartling.Connector.LinkFieldTranslator.dll
      Smartling.Api.dll, Smartling.Cms.Sdk.dll
      Polly.dll, SmartThreadPool.dll, WebSocket4Net.dll
    sitecore modules/Shell/Smartling.Connector/...
The items inside the packages (templates, settings items) are a separate concern. Serialize them with Sitecore Serialize or Unicorn, or install the package once per environment against the master database.
2. Build an asset-only image
The Dockerfile is tiny. It just holds the files
# escape=`
# Asset-only image: copied into CM via COPY --from. Never run as a container.
ARG BASE_IMAGE
FROM ${BASE_IMAGE}
COPY module\cm\content C:\module\cm\content
Any small Windows base works. We reused the PowerShell image already referenced in the compose file.
3. Register it in docker-compose
Add it as a service so compose knows how to build and tag it, but keep it out of the running environment
  smartling-init:
    image: ${REGISTRY}${COMPOSE_PROJECT_NAME}-smartling-init:${VERSION:-latest}
    build:
      context: ../../docker/build/smartling
      args:
        BASE_IMAGE: ${POWERSHELL_IMAGE}
    scale: 0
Then pass the image name into the CM build and make CM depend on it
  cm:
    build:
      args:
        SMARTLING_IMAGE: ${REGISTRY}${COMPOSE_PROJECT_NAME}-smartling-init:${VERSION:-latest}
    depends_on:
      - smartling-init
4. Copy the module into the CM image
In the CM Dockerfile, add the stage and the copy next to your other modules
ARG SMARTLING_IMAGE
FROM ${SMARTLING_IMAGE} as smartling
# ... existing stages ...
COPY --from=smartling C:\module\cm\content C:\inetpub\wwwroot
CM only. The connector does its work on the authoring side, so CD images don’t need the binaries.
5. Create database, Azure KeyVault and update application repo
You will first need to manually create the database in each environment and a database user with read and write permissions. Then add the username and password to Azure KeyVault so Kubernetes secret can read them. Then in cm.yaml
/platform-artifacts/cm.yaml
- name: Sitecore_ConnectionStrings_SitecoreLocalization
- value: Data Source=$(Database_Server);Initial Catalog=SitecoreLocalization.Smartling;User ID=$(KeyVault_Database_Username);Password=$(KeyVault_Database_Password);
6. Add the SitecoreLocalization connection string
The connector expects a connection string named SitecoreLocalization pointing at its own SQL database. In containers, the clean way is two parts
- An XDT transform that inserts a placeholder entry, so the name exists in
ConnectionStrings.config
<add name="SitecoreLocalization"
     connectionString="placeholder"
     xdt:Transform="InsertIfMissing"
xdt:Locator="Match(name)" />- The real value injected at runtime through an environment variable, which Sitecore’s container images map onto existing connection strings
  environment:
    Sitecore_ConnectionStrings_SitecoreLocalization: Data Source=${SQL_SERVER};Initial Catalog=${SMARTLING_DB};User ID=${SMARTLING_SQL_LOGIN};Password=${SMARTLING_SQL_PASSWORD}
In AKS or Managed Cloud, that variable comes from a Kubernetes secret in the CM deployment spec, the same way your core, master and web strings already do.
7. Build the asset image first in CI
This one bit us. COPY --from needs the asset image to exist locally before the CM build starts. Add an explicit build step before CM in every environment’s pipeline
- run: docker-compose --env-file=dev.env build solution --no-cache
- run: docker-compose --env-file=dev.env build smartling-init --no-cache
- run: docker-compose --env-file=dev.env build cm
The asset image doesn’t need to be pushed to the registry. Only the resulting CM image does.
Environment specific config with XDT
The connector sends and receives translation jobs through a Sitecore scheduled agent, QueueProcessingAgent. Out of the box it runs every few hours. That’s fine for production, but painful when your content team is testing a round trip in lower environments and waits half a day to see translated content come back.
The fix is a per-environment transform rather than editing the vendor config. We keep transforms in folders named after the environment, and the CM Dockerfile applies the folder that matches an ENVIRONMENT build arg
docker/build/cm/transforms/
  DEV/App_Config/Include/Foundation/Smartling/Smartling.Connector.config.xdt
  QA/App_Config/Include/Foundation/Smartling/Smartling.Connector.config.xdt
  UAT/App_Config/Include/Foundation/Smartling/Smartling.Connector.config.xdt
Each one only touches the interval
<configuration xmlns:xdt="http://schemas.microsoft.com/XML-Document-Transform">
  <sitecore>
    <scheduling>
      <agent type="Smartling.Connector.Tasks.QueueProcessingAgent, Smartling.Connector"
             interval="00:05:00"
             xdt:Locator="Match(type)"
             xdt:Transform="SetAttributes(interval)" />
    </scheduling>
  </sitecore>
</configuration>
Lower environments poll every 5 minutes. Production has no transform, so it keeps the vendor default. Upgrading the connector later won’t affect the setting, because the vendor file is untouched.
Issues we faced
1. The CM pod crash-looped because the DLLs never made it into git. Our first build had every config file and every .aspx under sitecore modules, but no bin folder. CM started, loaded the Smartling configs, couldn’t resolve Smartling.Connector types, and died. Over and over. The cause was, the repo’s .gitignore excludes bin/ everywhere, as most .NET repos do. The fix is to force include them or add git ignore rules to include them.
If your CM is crash-looping right after adding a module, check docker exec or the pod logs for a type-load error and then check that the DLLs are actually in the image.
2. The pipeline failed with “image not found”. Covered in step 7, but worth repeating. Compose doesn’t build scale: 0 services just because something depends on them. Build the asset image explicitly, before CM, in every pipeline (QA, UAT, DEV, PROD).
3. An environment file pointed at the wrong environment. While adding the per-environment transforms we found that one env file had ENVIRONMENT set to a different environment’s name, and two others had it blank. Nothing broke loudly. The wrong transforms just applied quietly. Since your XDT setup depends on that value, give every env file an explicit one and review it when you add environment-specific config.
4. Don’t bake secrets into the image. Our first pass passed the Smartling SQL login and password as Docker build args, set them as ENV, and used a PowerShell RUN step to write the connection string into ConnectionStrings.config. It works, but those values end up in the image layers and history in your registry. The placeholder-plus-environment-variable approach in step 5 keeps the image clean and lets Kubernetes secrets do their job.
Summary
None of this is specific to Smartling. The same pattern works for any classic Sitecore module that ships as a package, extract it, put it in an asset image, copy it into CM, and use XDT and environment variables for anything that differs between environments. Once it’s set up, a connector upgrade is a folder swap and a pipeline run, which is exactly how it should feel in a container world.