
Upgrading your AKS (Azure Kubernetes Service) cluster in Sitecore Managed Cloud Containers Environment is crucial for keeping your Sitecore environment up to date. New updates bring important security fixes, better performance, and new features. Timely updates ensure compatibility with other tools and services, helping to avoid problems and keep everything running smoothly.
Before we begin, please make sure you have DevOps access to your Sitecore Managed Cloud Environment in Azure. This post is for environments not configured with Disaster Recovery.
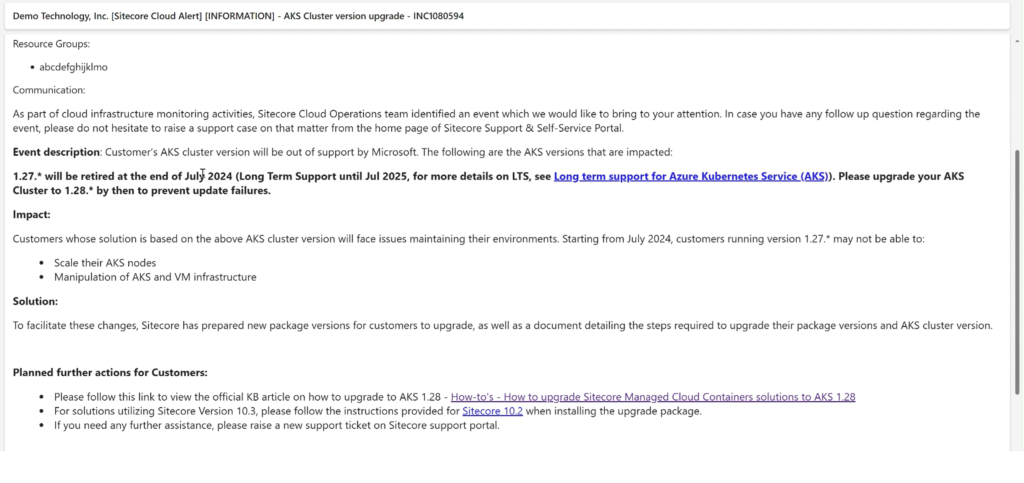
You will get an email from Sitecore about AKs cluster version upgrade. The email will contain some important information about resource groups and the current version and when it is going to be retired. The email also contains important instructions on how to upgrade your AKS cluster in this case to AKs 1.28
How to upgrade Sitecore Managed Cloud Containers solutions to AKS 1.28
Email shared by Sitecore in the Upgrade Cluster email https://support.sitecore.com/kb?id=kb_article_view&sysparm_article=KB1003392
Opened the link mentioned in the upgrade email. The link contains high level instructions on upgrading your AKS cluster. Luckily this version i.e. 1.28 does not have any breaking changes however you should pay attention to this section if there are any breaking changes in the version.
1- Download an upgrade package
Download an upgrade package for the required topology and version from the storage. Under the upgrade instructions you will find package names related to each Sitecore version in my case I’m using Sitecore 10.3 XM therefore I will choose the package name accordingly.
It is important to note that you cannot download the package directly from here you will need to have access to Sitecore Azure storage to be able to download these upgrades.
Clicking on the storage link will take you to Microsoft Azure Storage where all upgrade packages are located you can either find your package in the list list by the name that you saw in the instructions or you can search by the name and it will take you directly to that package you can click on it and then click Download save the package to your local disk folder.
2- Follow guidelines for Upgrade
Install the upgrade package to your solution (follow the guidelines for Sitecore 10.1, Sitecore 10.2, or Sitecore 10.3).
Unzip the downloaded package so we will go back to our folder right click and extract.
Update the Infrastructure Repository
- The instruction here are different depending upon if your instance is configured with Disaster Recovery or or not in my case it is not so I’m going to choose these instructions.
- We will need to create a feature branch in infrastructure repository in DevOps let’s head over to Azure DevOps the URL will look like https://dev.azure.com/SC-DemoTechnologyInc-1234567/ and select our environment.
- Make sure you are in the infrastructure repository and then headcover to branches to create a new feature branch that we will will use for this upgrade. I will just name it aks-1-128.
- Once the branch is created you can click on clone to get the URL to clone this repository in your local folder
- The default branch is main therefore we will need to switch to our aks-128 branch
- I have opened the downloaded package and cloned infrastructure repository side by side, we are going to copy files from the package to the infrastructure repository and you can click replace all files.
- Next step is to commit all your changes to the remote Repository
- Once the changes are pushed you will see create a new pull request option, click to create a Pull request from aks-128 branch to the main branch
- We can see all the changes in Pull Request, if you have not made any customization to the infrastructure repository then
- this should be pretty simple to quickly check and approve and complete the Pull Request.
- This will automatically trigger the infrastructure pipeline once the pipeline is completed you are good to move to the next step.
- If it fails you can run it again by clicking on run pipeline button at the top right corner
Update the Application Repository
- Let’s switch to the application repository.
- We will repeat the same steps that we did for infrastructure repository for for application repository
- We will create a new branch called aks-128, checkout branch on your local machine switch to aks-128 branch
- Copy files from the downloaded package commit and push all the changes to the repository
- Create a pull request into the main branch
- Application Repository is much more important because it usually contains custom changes which must be added back to the same place before merging the pull request
- Carefully review all the files especially init, main and secrets files, they will usually have some of your custom changes that must be added back for your custom changes you can either add those manually into the files which are changed by comparing the files in the bull request
- If there is no change related to AKS upgrade you can also simply take those files from the main branch and replace them in your aks-128 Branch finally push all the changes.
- Review them in pull request and once you are sure that it contains all the right changes you can just approve and complete the pull request.
- This will automatically trigger application pipeline if it succeeds you are good to go otherwise you can run the application pipeline Again by clicking run pipeline in the top right corner
- If the application pipeline continues to fail you can check logs and see if this is caused by your custom changes and fix those
- In case you are sure that these is not caused by your custom changes you can open a Sitecore support ticket to get the needed support from sitecore support team.
Run check cluster upgrades and cluster version upgrade pipelines
- Once the infrastructure and application pipelines are successful
- The next step is go back to pipelines and run check cluster upgrades pipeline
- Upon successful completion go to the pipeline then click on jobs and then click on check cluster upgrades
- Here we are looking for the latest version that is available which is 1.28.9
- We will just copy it the last step is to run cluster version upgrade pipeline here you can
- Open the pipeline click on run Pipeline and type in the latest version number which is 1. 28.9
- Click on run wait for the successful completion of cluster version upgrade pipeline
- You can go to Kubernetes services in Azure portal to check that the version have been upgraded successfully.
Congratulations!!! you have successfully upgraded your Azure Cluster. make sure to test your Sitecore CM to ensure that everything is working as expected.
Keywords:
AKS upgrade, Azure Kubernetes Service, Sitecore environment, Sitecore Managed Cloud Environment, Sitecore Managed Cloud Containers Environment, security updates, performance improvements, compatibility, regular maintenance, best practices, application efficiency
Hashtags:
#AKS, #AzureKubernetesService, #Sitecore, #SecurityUpdate, #PerformanceBoost, #Compatibility, #ITMaintenance, #BestPractices, #AppEfficiency